It's been a year since we upgraded our PV system. We re-roofed our house and I thought it would be good opportunity to review the pros and cons of upgrading. We had a 1.1kW Kaneka thinfilm system with a 1.7kW SMA inverter, with some room for more panels. We are lucky enough to be getting the 40 cents Feed in Tariff (FIT) on top of the miserly 8 cents Synergy pay us for any power fed to the grid. So, my main thought was what will our power bills be after the FIT ends in mid 2020? Based on the current power prices (+5% price rises) they actually worked out to be quite high, mainly because of the low price for power fed to the grid. It would be nice to think that common sense would prevail in this area (eg parity with prices we pay them), but I doubt this will happen any time soon. Anyway, I'm not a big fan of paying bills, especially thinking of the future when I'm retired. So we looked into an upgrade.
I got some quotes and advice on upgrading. It turns out you can keep the FIT as long as you keep your original inverter. It also turns out that you can overload most inverters and we decided to upgrade to a 3.1kW system. The panels are REC 260PE's, with six facing due North and six facing due West. Spreading them in two orientations means that we will also use more PV power in the home, which is best post FIT. The system cost $4,650 installed with new racking, etc. We were lucky enough to sell our old Kanekas for $900 to someone who wanted to expand his system and needed the same panels to be compatible with the existing ones. All up this took the price to $3,750. Here are the first year's data:

To sum it up we had a yearly bill of -$612 (credit), the Business as Usual (BAU) bill (ie no PV) would have been $630 so we saved $1,242. This makes the payback time roughly three years, after that we'll have three more years of FIT and then we'll still have small to negative bills for the next 25-40 years. Apart from the economics, getting more PV is better for the planet too. Remember, business as usual is not an option if we are to keep the planet from cooking...
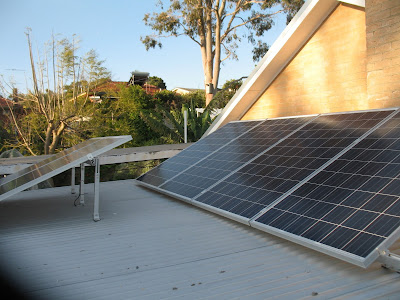
Here's the N facing set:

Overall we're chuffed with the new system. Comparing the old system's generation to the new one is interesting. Theoretically a 3.1kW Kaneka setup would have generated 11.9kWh/day (based on last 6 year's data) compared to the 9.7kWh of the new system (although our roof would not be large enough!). I think the reason for this is threefold. Firstly, I think there is something the experts call clipping happening. This is when the panels generate more power than the overloaded inverter can handle and some power is wasted. Secondly, the West facing panels would be generating less power than the North facing ones due to low morning generation. Thirdly, I think the Kaneka panels are better suited to Perth's heat and produce more power than mono and poly crystalline panels. I have seen this effect at our local Primary school where two systems side by side are located. The smaller thinfilm system (2kW) produces significantly more power than the larger (2.3kW) monocrystalline system.
That's all folks. Food for thought if you're in the same boat as us.
I got some quotes and advice on upgrading. It turns out you can keep the FIT as long as you keep your original inverter. It also turns out that you can overload most inverters and we decided to upgrade to a 3.1kW system. The panels are REC 260PE's, with six facing due North and six facing due West. Spreading them in two orientations means that we will also use more PV power in the home, which is best post FIT. The system cost $4,650 installed with new racking, etc. We were lucky enough to sell our old Kanekas for $900 to someone who wanted to expand his system and needed the same panels to be compatible with the existing ones. All up this took the price to $3,750. Here are the first year's data:

To sum it up we had a yearly bill of -$612 (credit), the Business as Usual (BAU) bill (ie no PV) would have been $630 so we saved $1,242. This makes the payback time roughly three years, after that we'll have three more years of FIT and then we'll still have small to negative bills for the next 25-40 years. Apart from the economics, getting more PV is better for the planet too. Remember, business as usual is not an option if we are to keep the planet from cooking...
Here's the N facing set:

And the West facing set (on the garage roof):

Overall we're chuffed with the new system. Comparing the old system's generation to the new one is interesting. Theoretically a 3.1kW Kaneka setup would have generated 11.9kWh/day (based on last 6 year's data) compared to the 9.7kWh of the new system (although our roof would not be large enough!). I think the reason for this is threefold. Firstly, I think there is something the experts call clipping happening. This is when the panels generate more power than the overloaded inverter can handle and some power is wasted. Secondly, the West facing panels would be generating less power than the North facing ones due to low morning generation. Thirdly, I think the Kaneka panels are better suited to Perth's heat and produce more power than mono and poly crystalline panels. I have seen this effect at our local Primary school where two systems side by side are located. The smaller thinfilm system (2kW) produces significantly more power than the larger (2.3kW) monocrystalline system.
That's all folks. Food for thought if you're in the same boat as us.