So here is the promised 'how to make a bees wax sandwich wrap' post!
These are so simple to make, we even did a Make Your Own stall at our local farmers market (to be the subject of another post). I've been using my sandwich wrap for about eight months and it's still going strong. I love them so much I also made some larger ones to use for wrapping my loaf of bread and also storing lettuce, celery etc in the fridge to stop them going limp - you know it's true, plastic does keep veggies fresher, but now there is an alternative!
You will need:
Cotton fabric approx 30 x 30cm. This is a good size for wrapping sandwiches but of course you can make them bigger if you like.
Pinking shears. It's cute to use pinking shears to make the edges zig zag but not 100% necessary because the wax will stop it fraying.
Bees wax. If you have access to a hive you can refine your own but if not you can often get it from farmers markets or online.
Cheese grater. You can use your good one and once you've finished grating the wax clean it by pouring boiling water over it. You might need to do this a few times.
Iron. Best to find an old iron from an opshop but you can use your good iron by covering it in alfoil.
Old towel to iron on. I think this is better than an ironing board so you can spread your gear out.
Baking paper.
Method:
Grate your wax. This is pretty time consuming but easy. It looks like parmesan cheese once grated and is endlessly fondle-able. You'll need about 1/2 cup grated wax for one 30 x 30cm wrap, but less as you make subsequent ones because there will be residue left on the baking paper.
Cover your iron with two layers of alfoil if you're using your good iron. Lay out your towels on a table for ironing on. Lay out your baking paper - you will probably need to overlap two sheets to make it wide enough for the fabric.
Cut out your fabric - here are the students cutting them at school. You can get some fantastic prints from fabric shops or if you want to be super sustainable you can cut up old shirts, bed sheets etc.
Lay your fabric on the baking paper and sprinkle on the grated wax just like sprinkling cheese on a pizza.
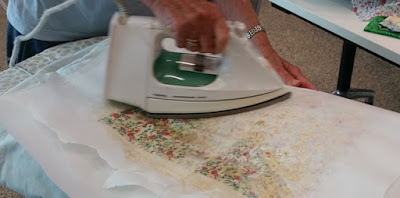
Then lay over another layer of baking paper - again, you will need to overlap two pieces. Then get busy with the iron. It takes a little work to get it all melted and you have to be sure to sweep the iron from the centre to the edges to get the wax pushed out to the edges. You can see it going all melty under the paper so its pretty easy to judge how you're going.
Once it's all covered and while its still hot peel back the top layer of baking paper and then peel off the fabric by the corners. Its good to have a helper at this stage to hold down the bottom layer of baking paper. It takes about a minute for the wax to dry, so you can just wave it around for that long or place it on a clothes airer.
And this is the final product! The bees wax has anti bacterial properties which I really like and they smell great! To clean them simply lay them out and wipe with luke warm soapy water - not hot or the wax will melt again. I haven't tried but my eight month old wrap is looking a little sad now but I suspect if I ironed it again between the baking paper it would come back to its former glory.
Here we are making them at Hilton Primary School with the year 5/6 class. It really was such fun. The teacher had the kids working on other maths activities and we took three students at a time to the back of the class and made them. It took a couple of hours, but that's because lots of the kids loved them so much they stayed in at lunch time to make extras for their friends and family.
Lat weekend we did a second big event with a Hilton Primary School P&C stall at the local farmers market. We had four parents and three students helpers and we made about 70 wraps. I'll write a separate post about how to do that as a big event just in case you're as inspired as I am to cut the plastic AND get everyone else around you to too!


