Isn't it funny how things work out. Just a few weeks ago I was talking here about how the chook's egg production dips in winter and the need for insulation in chook houses. Then I got some coolroom panels on Freecycle, which we have been looking for for the roof of the Hilton Harvest Chookship. The panels turned out to be no good for the job, so a light bulb went off in my head. Why don't I use the panels to insulate our drafty old tin chook house. So I got up early last Sunday and got to work (a nice cool day for a change). Amy strolled up after a nice long sleep in to view the progress. She casually remarked on how good it would be if we made the house taller so we could walk in to it. At first I thought that's a great idea, but then it dawned on me that a small project would turn into a 3 day mission. We debated this for a while until consensus was reached that we didn't really need to do the extra work (Phew!).
This is how it looked before the reno.

I did the roof first, with nice thick 150mm panels (the R rating of these is over 4). The panels are just aluminium on the outside with polystyrene on the inside. I cut the panels to length (with a grinder and saw). Then I ripped off the old roof and put some jarrah boards in to attach the panels to more easily.

The tricky part was lining up the holes in the panels with the wood. I had to drill one side of the panel, then flip it and drill the other side (didn't have a long enough drill bit). Then I pushed out the polystyrene between the two holes and put the panel in place. The next step was to put an 8" bolt through the hole and push on it to mark the wood, take the panel off and drill the wood, put the panel back on and put the bolt through, attaching it with a washer and nut the other side. I did this for all 6 holes, maybe I'll buy a long drill bit when I do it for Hilton Harvest! Anyway, it worked out well with only one hole needing to be drilled twice. The roof has a western pitch, so it won't radiate heat in summer and will keep the chooks warm in the winter nights.


I installed one 100mm and one 70mm thick panel on the western side too. Unfortunately I had to leave a piece of tin on one end because there wasn't room between the big adjacent tree trunk and the shed. This panel should deflect the hot afternoon sun in summer and keep the cold out in winter.

I also put in a panel on the southern side and one on the eastern side (thinner 70mm panels). These were easier since I just needed 90mm tek screws to attach them.

Lastly I put flashing on to clean it up a bit and I've allowed for the vents in the upper parts of the side walls to be boarded up in winter to keep the wind out and the heat in. I had some bits of zincalume left over from the solar pergola which worked well to cover exposed polystyrene and shed water. The shed is not solar passive unfortunately (that would have involved tearing it down and moving it and starting all over again), which means that the sun will not be able to heat up the place in winter. Still, I think it's a great improvement. The total cost for the project was about $100, mainly for the flashing and screws and nuts and bolts.


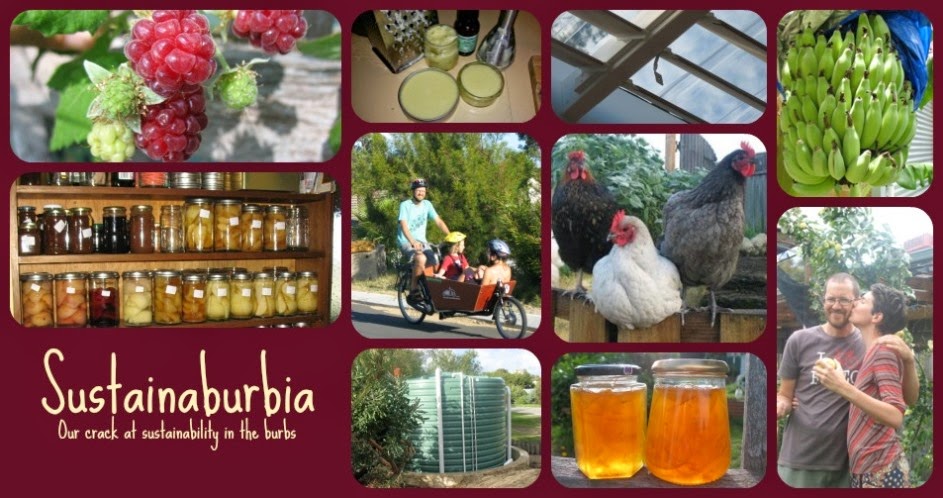
We had another disastrous egg sitting experience, so we've said "Bugger it" and got 4 hybrid Hi-lines from City Farmers. Here is one of them checking out the new accomodation.


We can't wait for the eggs to start flowing on a more regular basis.
This is how it looked before the reno.

I did the roof first, with nice thick 150mm panels (the R rating of these is over 4). The panels are just aluminium on the outside with polystyrene on the inside. I cut the panels to length (with a grinder and saw). Then I ripped off the old roof and put some jarrah boards in to attach the panels to more easily.

The tricky part was lining up the holes in the panels with the wood. I had to drill one side of the panel, then flip it and drill the other side (didn't have a long enough drill bit). Then I pushed out the polystyrene between the two holes and put the panel in place. The next step was to put an 8" bolt through the hole and push on it to mark the wood, take the panel off and drill the wood, put the panel back on and put the bolt through, attaching it with a washer and nut the other side. I did this for all 6 holes, maybe I'll buy a long drill bit when I do it for Hilton Harvest! Anyway, it worked out well with only one hole needing to be drilled twice. The roof has a western pitch, so it won't radiate heat in summer and will keep the chooks warm in the winter nights.


I installed one 100mm and one 70mm thick panel on the western side too. Unfortunately I had to leave a piece of tin on one end because there wasn't room between the big adjacent tree trunk and the shed. This panel should deflect the hot afternoon sun in summer and keep the cold out in winter.

I also put in a panel on the southern side and one on the eastern side (thinner 70mm panels). These were easier since I just needed 90mm tek screws to attach them.

Lastly I put flashing on to clean it up a bit and I've allowed for the vents in the upper parts of the side walls to be boarded up in winter to keep the wind out and the heat in. I had some bits of zincalume left over from the solar pergola which worked well to cover exposed polystyrene and shed water. The shed is not solar passive unfortunately (that would have involved tearing it down and moving it and starting all over again), which means that the sun will not be able to heat up the place in winter. Still, I think it's a great improvement. The total cost for the project was about $100, mainly for the flashing and screws and nuts and bolts.


We had another disastrous egg sitting experience, so we've said "Bugger it" and got 4 hybrid Hi-lines from City Farmers. Here is one of them checking out the new accomodation.


We can't wait for the eggs to start flowing on a more regular basis.
No comments:
Post a Comment